How To Assemble Your Bike From A Box
Putting together a new bike from the box can be a little intimidating. This step-by-step guide will help you do it yourself and recognize when you need help. Most bikes come virtually assembled. A few, though, may require the help of a bike professional. If you are near one of our shops, we can assist. Read the steps and watch the video. You might find that you have more skills than you initially thought.
Bicycle Assembly Instructions
If you assemble your bike, putting it together at home is relatively easy. Below, please find step-by-step instructions on assembling your bike and a few tips. Take your time, make small adjustments, and test after each step. Don't force anything or overtighten screws, as this can damage components. If you need clarification on any step, consult your manual or seek professional help from a qualified bike mechanic. It's important to note that specific adjustment steps and terminology might vary depending on your bike's brand and model. Always refer to your manual for the most accurate and relevant instructions. We always recommend taking it to your favorite local bike shop for the best results for assembly.
What you will need:
- A set of hex Allen keys and Torx wrenches.
- A small torque wrench is optional (if you bought a carbon fiber bike, we strongly encourage a torque key or wrench `to meet the factory specs).
- A 15mm or Hex wrench is handy for attaching the pedals.
- A small flat blade and Phillips screwdriver.
- A small amount of grease for the seat post and pedal threads.
- Carbon assembly paste (only if your bike is carbon).
- A pump or compressor to fill the tires.
- A shock pump to set the air pressure in your air fork or shock (you can run to your local bike shop and have them help you with this).
Unboxing your new bike
- With the box upright, work the box length with your hand or flat object to open the top flap. We recommend removing staples so you don’t scratch your bike or cut your hand.
- Be sure to go through everything.
- Sometimes, smaller parts and accessories aren’t on the bike. Check everywhere for small parts in the box.
- Remove all the packing material.
Insert the seat post
Unpack the seat post. In most cases, the saddle will be attached. Before inserting the seat post, put a smear of carbon assembly paste (carbon bike) or regular grease around the inside diameter of the seat tube. You can set the correct saddle height later.
Wipe off any excess assembly paste with a clean rag.
Torque the seat post clamp (usually 6-7 Nm).
Attach handlebars
- Locate the clamp area on the front fork where the handlebar attaches.
- Position the handlebar. Align the handlebar in the stem, ensuring cables aren't twisted. Center it and adjust it to your preferred angle.
- Loosely tighten the stem and bar clamp.
- Position the bars. Use hex keys to tighten the bolts evenly and securely. These bolts usually require 5-6 Nm of torque. Some of your newer and mid to high-end bikes have integrated cockpits. The handlebar and stem may be one piece.
- To pre-load the headset bearings on a conventional setup, first, slacken off the stem bolts. Make sure the top cap is in place, and then tighten the cap so the headset is not binding and not loose. Then, tighten the stem bolts.
- Lastly, align the stem with the front wheel and torque the stem bolts.
- For a two-piece stem and handlebar, remove the plate from the stem. This holds the handlebars to the stem. Insert the handlebars and tighten the face plate. Be sure to tighten them evenly. It should usually give you an even gap or space between the bolts and the faceplate.
- Check and straighten the stem so it aligns with the front tire. Evenly clamp the stem bolts.
- Confirm the bars are straight before finally torquing up the bolts.
- Test the bars and steering stem for tightness before you ride.
Insert the front wheel
- Insert the front wheel into the fork. Check the orientation of the front wheel by locating the rotation/direction arrow on the tire's sidewall.
- There are two types of axles on a bike. A Thru-axle is most common on mountain bikes. A thru-axle bolts the wheel directly into threads in the fork or frame. Or, a quick-release skewer. A quick-release skewer passes through the wheel’s axle. The fork and rear of the frame have open slots (dropouts) at the bottom, which sit over the hub's axle. The skewer is fixed in place by threads in the dropout or using a nut on the threaded end of the skewer. Once threaded in place, you can tighten the through axle or use the lever to add the final tension, clamping the frame onto the hub's axle. Closing the lever should require enough force to leave a mark on the palm of your hand.
- Make sure the wheel is straight because misalignment in the dropouts can cause the brakes to rub.
Inflate the tires
- Now, it's time to inflate the tires. Inflate the tires and, as a starting point, check the pressure against the recommended range marked on the tire sidewall. Most tires allow a little over or under-inflation.
- For more information, check out our guides on how to pump up a bike tire, inner tube sizes, and valve types, and how to set up tubeless road tires, and mountain bike tire pressure on our blog page.
Install pedals
- Greasing your pedal threads will help stop them from seizing.
- While your bike may be supplied with demonstration pedals, most riders will choose to fit their own, whether flat or clipless.
- You'll need a pedal spanner or Allen key to tighten the pedals.
- Install the pedals with a spanner or Allen key (depending on the pedal itself).
- Pedal threads are side-specific, and both pedals tighten up in a forward direction. If you’re unsure which pedal goes on which side, they should be marked with L and R.
Set the saddle height
- Don't forget to check the saddle is straight.
- Check the saddle rail bolts are tight, that the saddle is level, and that the seat is at the correct height for you.
- Now, ensure the seat post clamp is tightened (usually around 6-7 Nm).
- Saddle height is one of the crucial components of a bike fit. You may want to seek advice from a pro.
Checking Your Work:
- Brakes: Test both brakes for proper engagement and stopping power. Adjust if needed.
- Wheels: Spin both wheels freely, checking for any rubbing or wobbling. Ensure axles are tight.
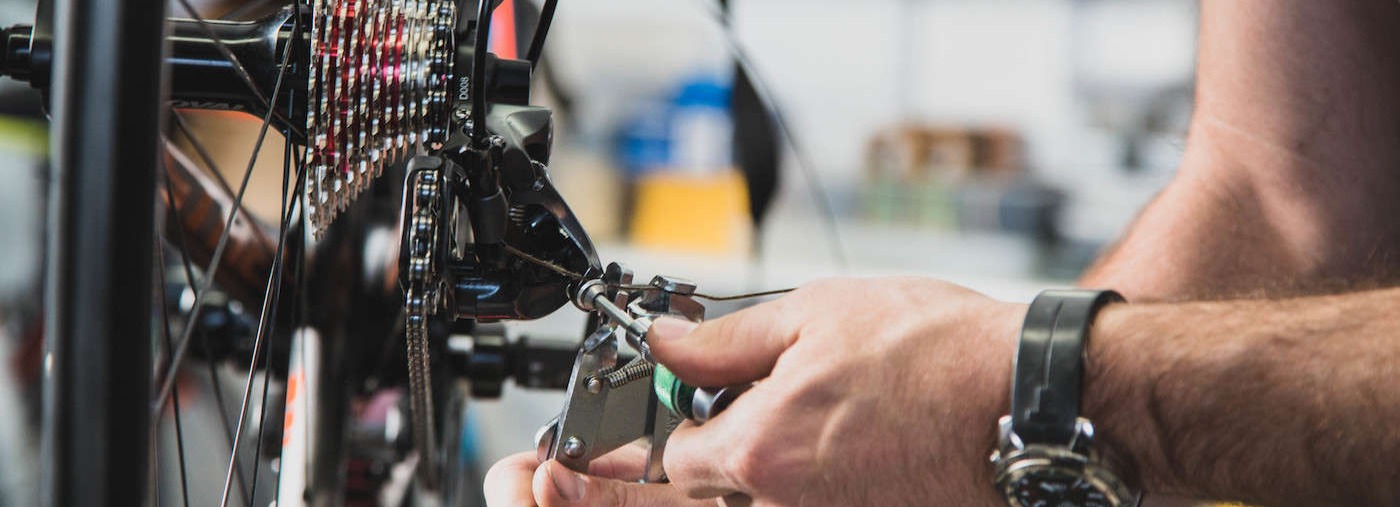
- Gears (if applicable): Shift through all gears to ensure smooth and silent operation. Adjust derailleurs if needed.
- Seat: Bounce on the seat, checking for proper height and secure clamp.
- Overall: Double-check all bolts and fastenings for tightness.
Final Touches:
- Inflate tires to the recommended pressure printed on the sidewall.
- Install any accessories like lights, fenders, or reflectors.
- Take your new bike for a test ride!